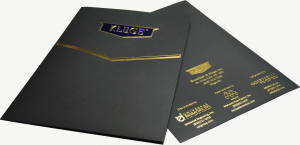
Foil stamping (also referred to as hot stamping, gold stamping, foil printing, hot foil, foil blocking and foil embossing) adds visual appeal to any marketing piece, transforming it from ordinary to elegant.
   Brand Strength
Many multinational companies use hot-foil-stamping techniques to enhance their brand strength and credibility. The impact and impression are always the same: upmarket conferring brand strength and credibility.
Attention Getting
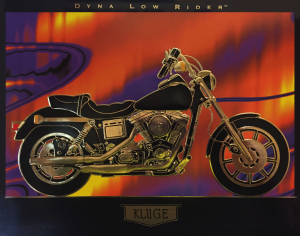
Hot foil printing and embossing elevates printed material to attract the customer’s attention ahead of other competing brands and products. Visually it can be very striking.
Areas of Application
Fields of application are many and growing; from stationery, presentation folders and business cards to annual report and account covers. The packaging industry has long been taking advantage of foil printing and embossing, attracting attention on store shelves. Increasingly, foiling and specialty coatings are used on magazine covers. Book jacket covers almost always use these techniques to stand out on the book shelves. In a market place where the customer’s attention span is shortening, hot foil stamping is becoming increasingly important to attract attention.
Types of Foil Stamping
Based on your substrate and the type of finish you want, you can choose from one of the four hot foil stamping techniques discussed below:
FLAT FOIL STAMPING – A simple, economical process where a copper or magnesium metal stamp is used to transfer the foil onto the substrate.
VERTICAL FOIL STAMPING – Used to stamp foil designs on flat substrates and cylindrical shaped areas.
SCULPTED FOIL STAMPING – Uses brass dies to achieve a raised image for a clearly defined and carved look.
PERIPHERAL FOIL STAMPING – Foil heat transfers are applied to the outer perimeter across the entire circumference – of the product.
The Foil
 Typically, gold and silver coloring are used to create a luxurious effect. However, the variety of foil finishes, such as glossy, matte, metallic, holographic sparkles and wood grains continues to grow.
The Die
While there are several processes (including digitally) with which foil may be applied to material, the most common is the use of an etched metal die. Magnesium, copper and brass are the three metals used for foil dies, ranging in cost from low to high, respectively. Lower cost magnesium is typically used for a piece that will only be used one or two times. For greater durability and more consistent imaging, copper is used, while brass may be used in continuous, high-quantity production.
The most common method for making dies is acid etching. Essentially a plate of metal is covered with a photosensitive layer. The artwork is printed on film and exposed with UV light onto the die plate. The plate is then washed, leaving only your artwork. This is put in an acid bath and all the ex-posed areas are etched away, leaving your impression raised and ready to be used for foiling!
The Process
When mounted to foiling equipment, the foiling die on which your design is etched, is heated and stamped with high pressure to bond a thin layer of foil to your marketing piece, whether unprinted or pre-printed. The application of heat and pressure is the core approach that delivers the desired result on the material.
The Substrates
The best impact for foil is going to be on smooth, coated surfaces, like cast-coated (high-gloss) and gloss stock. Dull (also referred to as satin or matte) coated stocks take foil well, as do smooth, uncoated sheets. Heavier stocks are more durable and hold up better to the process, although text weights may be used. Textured papers like linen or felt are more difficult, since the surface texture may affect the way the foil is pressed onto the sheet, and your image might not be as crisp as it could be. Also, while you can foil on top of wax-free inks, you should avoid using coatings or varnishes (UV, aqueous or laminate) in the area to be foil stamped.
The Art File
-
-
- VECTOR FILES – The most important thing to know about creating artwork for foil is that it needs to be created in vector, not bitmap/raster. The reason for this is that the artwork is output on film at a high resolution. Generally, “high resolution†bitmap/raster art is 300 dots per inch. Therefore, the use of art other than vector would result in a die with jagged edges, which will cause problems in foiling and make your final product look less than desirable. Vector art, on the other hand, doesn’t have a resolution as it is all lines and curves that can be expanded or reduced without affecting the resolution. In practicality, this means that artwork needs to be created in Illustrator, InDesign or another program that creates vector-based output files — generally PDFs or EPS files.
- COLOR VALUES – The second most important thing is that you can only use 100% values. You can’t make a gradient in a foil. You can’t do shading. You can only do black and white. The reason for this is that the film output has only black and white. So grays are output as a dot pattern. This doesn’t make for a usable die. For this reason, die art needs to be created in a CMYK color space where black is 100% black.
- REGISTRATION – Due to image shifting during both the printing and cutting processes, as well image expansion on uncoated stocks, we do not recommend tight registration between foil image and printed image. However, when desired, we recommend that you include a registration mark in your foil artwork that is also repeated on the printed sheet. This needs to be outside of the final crop/cut line of your art- work. Two or three simple “+†marks in your artwork will do the trick.
- LINE WIDTHS – We don’t recommend line widths thinner than 1pt. This is especially important if you are intending to use magnesium dies, as a raised area that is thin will more likely disappear after a few hundred impressions. Thin lines are tantamount to creating a blade, and as the image is impressed onto the stock, it may cut into the stock.
- SOLID AREAS – Try to break up areas of foil. Large areas of foil (a solid area of 2†x 3â€, for example) are very hard to foil. If you’ve ever tried to put a screen cover on an iPhone or iPad, then you will know that trying to get something cleanly on such a large area without having dust or air pockets is near impossible. Add to that the fact that foil requires the application of tons of pressure – the more area being foiled, the more pressure needed.
- MIXED DETAIL – Avoid having large foiled areas mixed with fine detail. Large areas require a different adhesive release than fine detail. Mixing the two on the same die means using a medium-release foil and trying to adjust it for both the detail and the large blocks of foil. This can add hours of time, and waste and even, perhaps even making the job impossible to run.
-
For more information, please email us at [email protected], or call us.